
Our first step will be marking the ledger board (wood against the house). This will ensure that everything from joist spacing, attachment to the house, and most critically, the location of our pattern board works out nicely.

If we peek ahead you can see all of things we need to mark out!

The first task is finding the center of your ledger board, in this case, 93”. Next add half the pattern board’s width (usually 2 ¾”) to represent the far edge of the pattern board, and finally mark the opposite edge of the pattern board. These two marks will be the joists that support all of the decking on either side of the pattern board. It is a good idea to mark an “x” on which ever side of the line your joist should be installed.

Test

The final things to mark are the spots for attachment to the house. Check with your building department, but around here the rule is 32” on center for fasteners. Be sure when marking that you allow space for the joist hangers to be installed and move the spacing closer if a conflict arises as in the example.

Once the ledger is installed you can frame as per normal since we now know where all the joists are located. Start at one end and install joists until you have reached the pattern board.
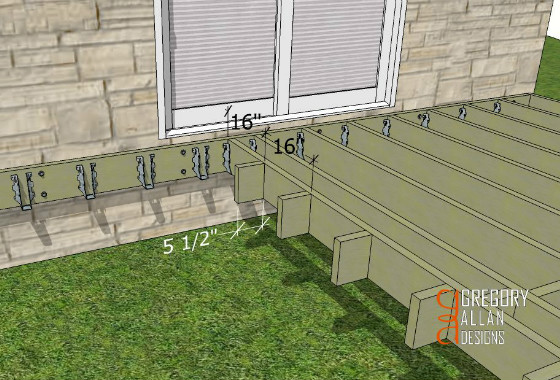
Next assemble a joist with 5 ½” bridging pieces spaced 16” on center and install it. It is paramount that these blocks be flush to the top of the joist as the “joint” between the decking and pattern board occurs here.

Install the second pattern board joist being sure that the bridging stays flush to the top of this joist also.

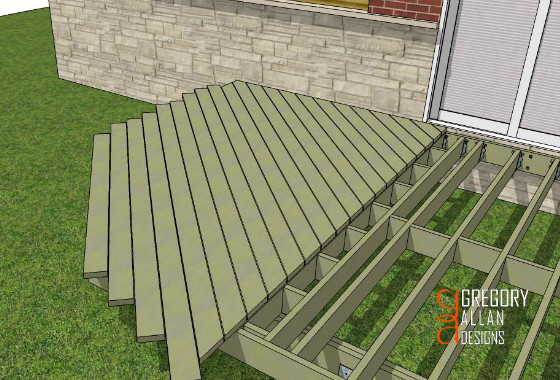
Complete the framing and install the fascia board since the decking is on a 45 degree angle.

Start laying the decking. In this example we have one face that is parallel to our decking and so along this face is where we will start with a full board. Leave the board overhanging the edges of the deck – they will be cut later.

Install all the deck boards in this fashion until you near the house. Once you are within one board width of the house be sure to cut the ends of the deck boards to match your framing. Trying to cut this board so close to the house later will result in much frustration and cursing!

Finish laying the deck boards for the first half of the deck. Leave one tiny piece near the pattern off for now so you can see the joists below to mark accurately. You can cut and fit this piece later.

Mark a line back from the edge of the first pattern board joist the same width as the gap between boards. In this case that is ¼”. This is easy to do since we left that last tiny piece of decking until later.

Repeat this process on the front of the deck. Since all of the decking is down you will have to look between the boards to locate the first pattern board joist. Then mark ¼” back and snap a chalk line.
Now your deck should look something like this. Don’t forget to install the little triangle at the house that was left out earlier. If it ends up really small try some construction adhesive instead of a screw to avoid splitting the piece.

When the pattern board is eventually installed you want the points of the deck boards to be square to one another. The best way to do this is to start the balance of the decking in the middle of the depth of the deck.

This first deck board is critical. It must be installed on the exact same angle as the board opposite it (assume 45 degrees) or the points either side of the pattern board will run off from being nice and square to each other and look terrible. Reference a previously installed board and measure from the edge of the pattern board to the point where it meets the house. Here we have 70 5/8”.

Mark that same measurement along the house in the opposite direction, except don’t actually mark the same length. Be sure to add the width of you pattern board, plus two times the width of your gaps. In this example that makes 6”.

Now install that board. The point along the pattern board should line up 6” off the already cut edge.

Fill in the rest of your decking and snap a chalk line parallel to the edge you have already cut, leaving a 6” space for your pattern board.

Finally trim around the deck, install your pattern board, add skirting, privacy screens, friends and a BBQ and you’ve got yourself a party!
Installing a Pattern Board
This tutorial will help add an touch of class and sophistication to any deck. Be sure to check the "Angled Decking is Fun!" tutorial before reading ahead. In this case the decking is installed on two different angles with a pattern board separating them.
To navigate through this step by step guide, hover over each picture and click on the " i " button for an explanation of each step.